
Easy Spooky Hot Chocolate: Halloween Hot Chocolate Bombs Recipe
Just so you know, this post contains affiliate links. That means if you use them to make a purchase, I may earn a commission. You can read my full affiliate disclosure HERE.
Halloween, the time of year when jack-o’-lanterns light up the streets and costumes take on a ghostly twist!
It’s a holiday that delights in all things eerie and enchanting, making it the perfect occasion to whip up some treats that match the theme.
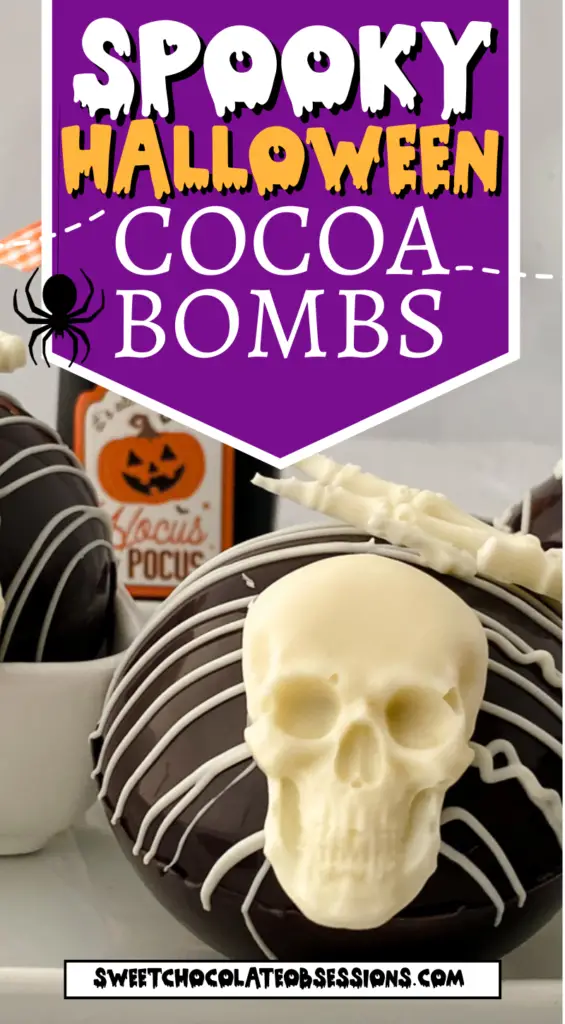
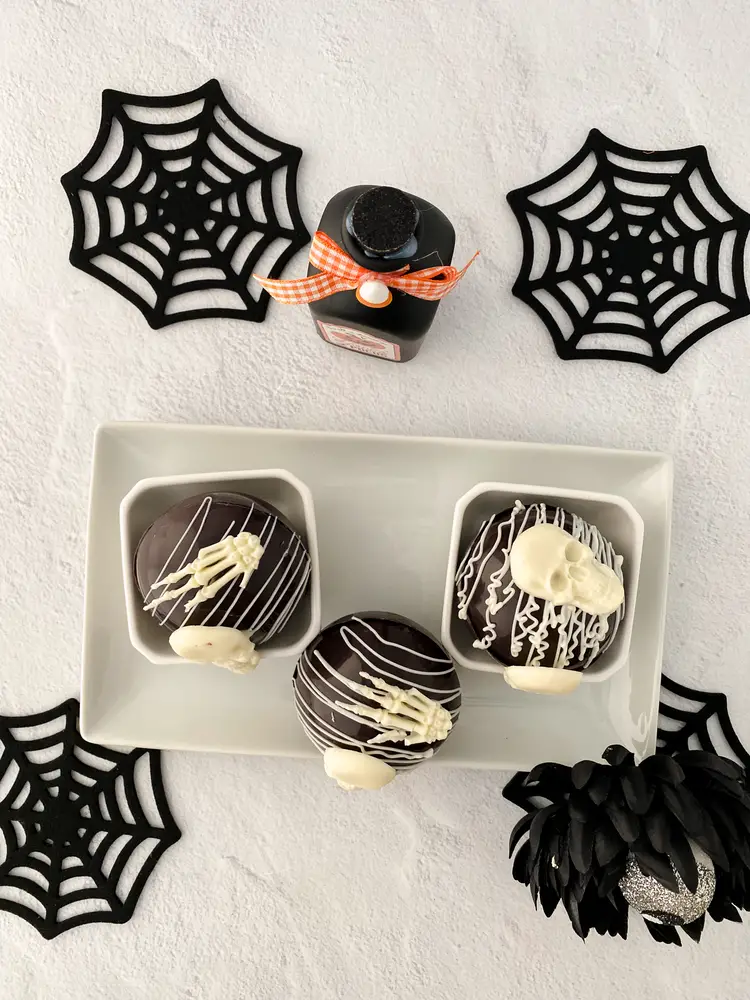
And what better treat than the bewitching Skeleton Cocoa Bombs?
These little spheres of chocolaty goodness are not only a delight to the taste buds but also a visual spectacle that adds a touch of magic to your Halloween celebrations.
Plus, they make fantastic gifts for friends, family, or anyone who appreciates a spooktacular surprise.
Halloween Hot Cocoa Bombs
Indulge in the Halloween spirit with these fall themed hot chocolate bombs! Crafted with precision and creativity, these easy treats begin by melting candy melts into chocolate candy shells.
Fill them with hot chocolate mix and mini marshmallows before sealing using either the hot plate method or piped melted chocolate.
The result? Delightful orbs that, when dropped into warm milk, reveal a ghoulishly delicious surprise, making your Halloween festivities truly enchanting.
Why Cocoa Bombs?
Cocoa bombs have taken the culinary world by storm, and it’s easy to see why! These delightful creations not only taste fantastic, but they also provide a fun experience as they burst open to reveal the hidden treasures within.
Imagine pouring warm milk over a cocoa bomb, watching it melt away to unveil a swirl of cocoa mix and a shower of mini marshmallows. It’s a little bit of theater in a cup that brings out the inner child in all of us.
The Joy of Making and Gifting
Crafting these Skeleton Cocoa Bombs is not only enjoyable but also surprisingly simple.
You don’t need to be a professional chocolatier to create these spooky delights. With a few basic tools and a sprinkle of creativity, you’ll have a batch of cocoa bombs ready to amaze your guests or put a smile on someone’s face.
And that’s precisely why they make exceptional gifts for Halloween! Whether you’re hosting a Halloween party, surprising your coworkers, or giving them out to trick-or-treaters, cocoa bombs are a thoughtful and unique present that everyone will adore.
Considerations for Candy Molds and Melts
As with any culinary endeavor, a little know-how goes a long way. When working with chocolate molds and melts, there are a couple of considerations to keep in mind to ensure your cocoa bombs turn out as well as you envision.
1. Smooth Melting: When melting your candy melts, remember to do it in intervals to avoid scorching. The addition of a small amount of coconut oil or paramount crystals helps achieve a smooth consistency, making it easier to work with.
2. Patience with Molds: Be patient when working with molds. Let the chocolate set properly at each stage before moving on. This ensures that your cocoa bombs come out of the molds with clean lines and a polished look.
3. Sealing Techniques: When it comes to sealing your cocoa bombs, you have options. From melting the rim and pressing the halves together to piping melted chocolate around the edges, choose the method that suits you best. It’s all about finding your chocolaty rhythm.
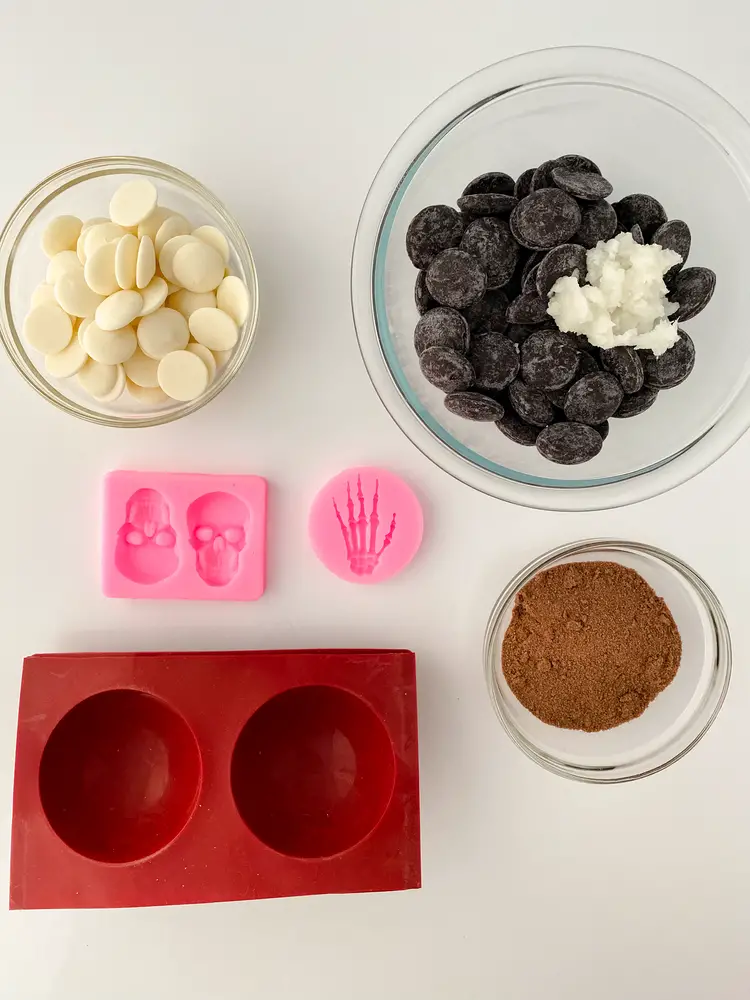
What You’ll Need
Now that you’re armed with the knowledge and excitement to create your own Skeleton Cocoa Bombs, let’s get started! You can find the half sphere silicone molds and skeleton molds you’ll need at the links below.
Equipment
- Cocoa Bomb Molds
- Piping bags
- Bowls
- Spoons
- Skeleton Mold
Ingredients
- 8oz BLACK Candy Melts
- 1/2 cup white candy melts
- 4 tbsp Hot Cocoa
- Mini Marshmallows
- Coconut oil or paramount crystals
Best Halloween Hot Chocolate Bombs Recipe
Instructions:
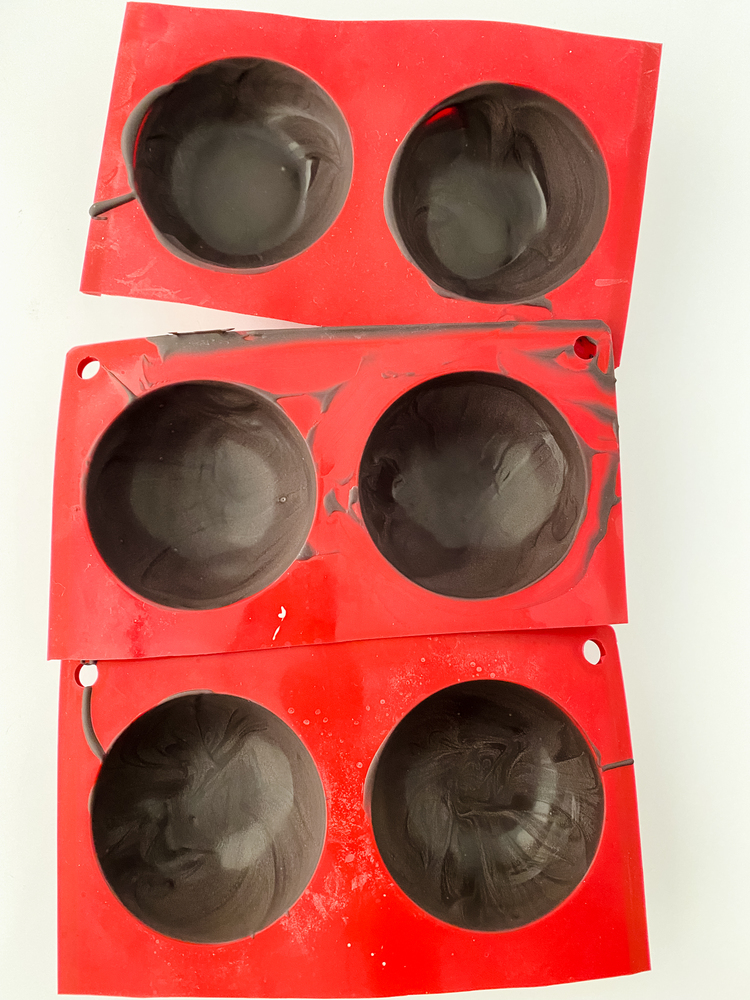
In a microwave-safe bowl, melt the black candy melts along with 1 tsp of solid coconut oil or paramount crystals for 30 seconds.
Stir and microwave for an additional 30 seconds. If needed, give it 10-15 seconds more, stirring until smooth.
Add a heaping spoonful of melted chocolate to the cocoa bomb mold and coat its interior with the back of a spoon. Freeze for 15 minutes.
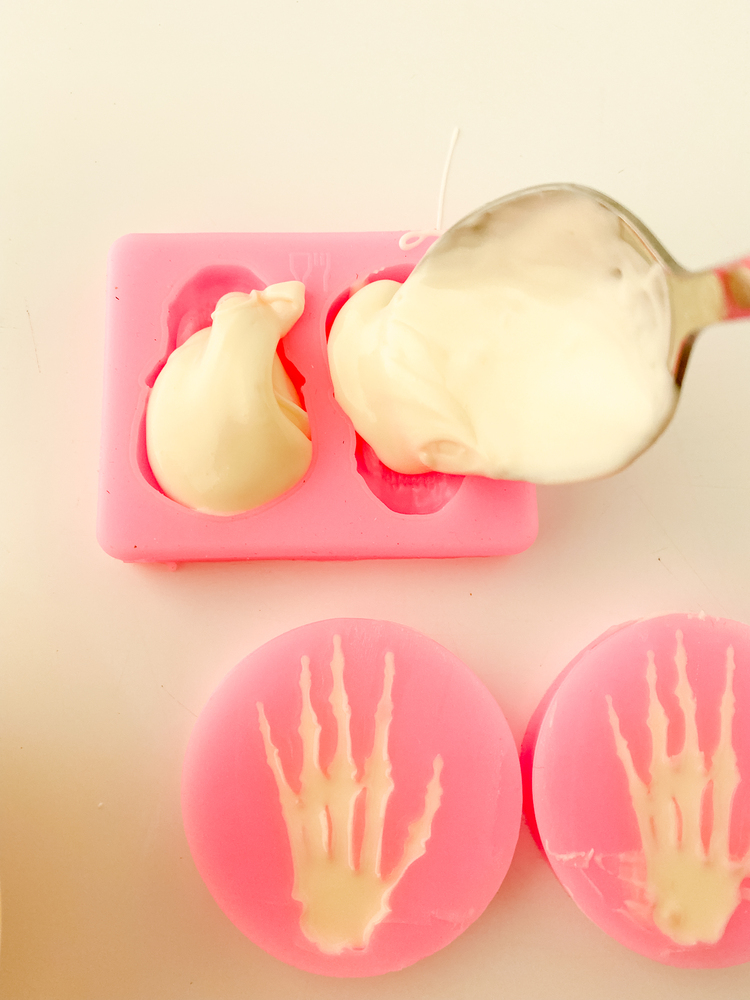
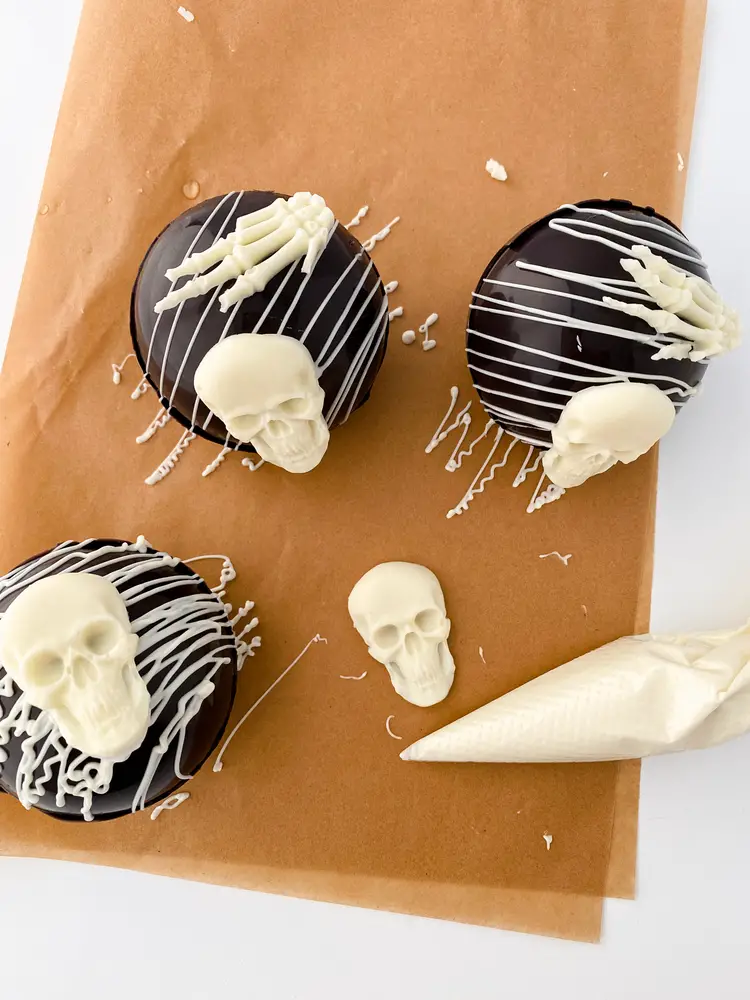
Melt the white chocolate using the same method and spoon it into the skeleton mold. Freeze for 10-15 minutes.
Carefully remove the chocolate spheres from the molds.
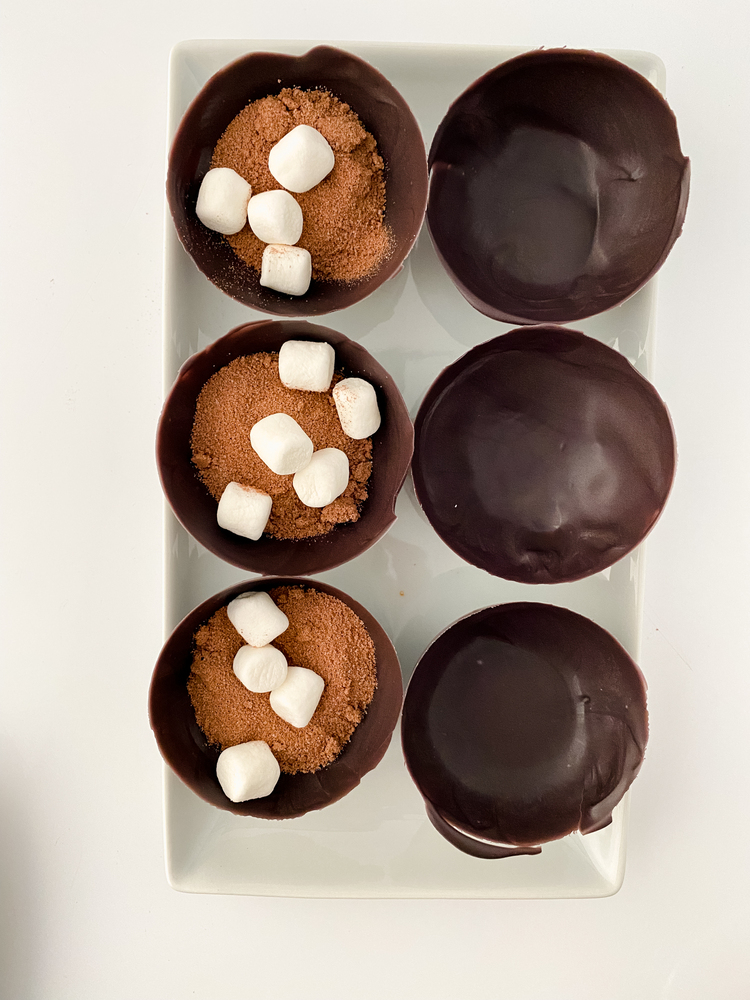
Fill one half with a tablespoon of hot cocoa mix and mini marshmallows.
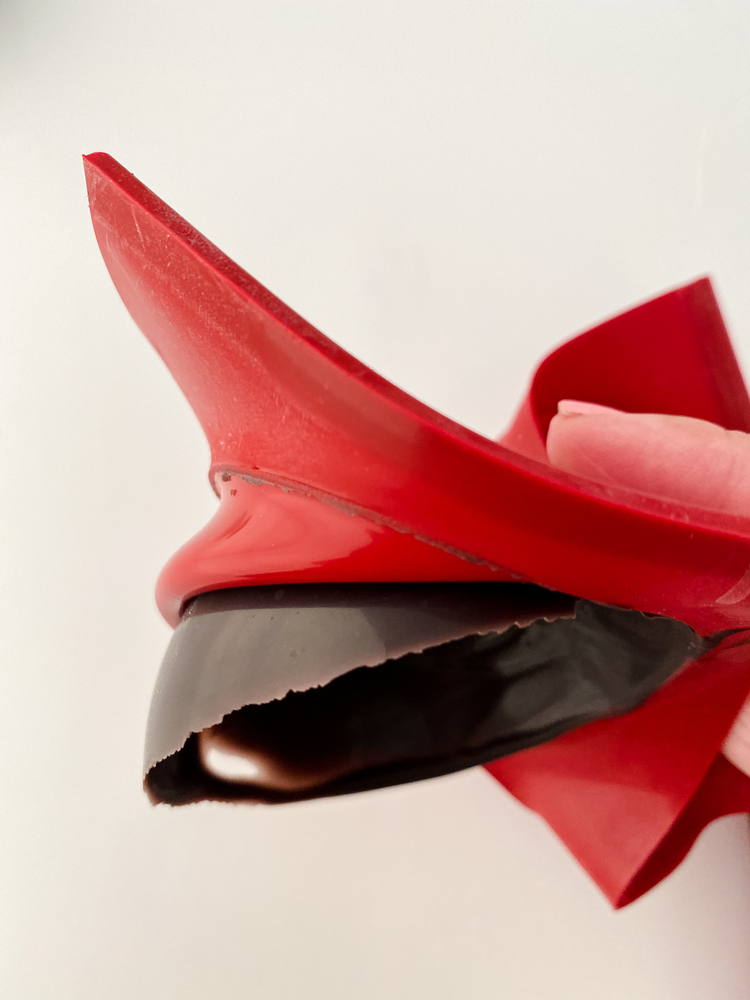
Seal the cocoa bombs by melting the rim of one half and pressing it to the other. Alternatively, use the hot plate method or pipe melted chocolate (see methods further down).
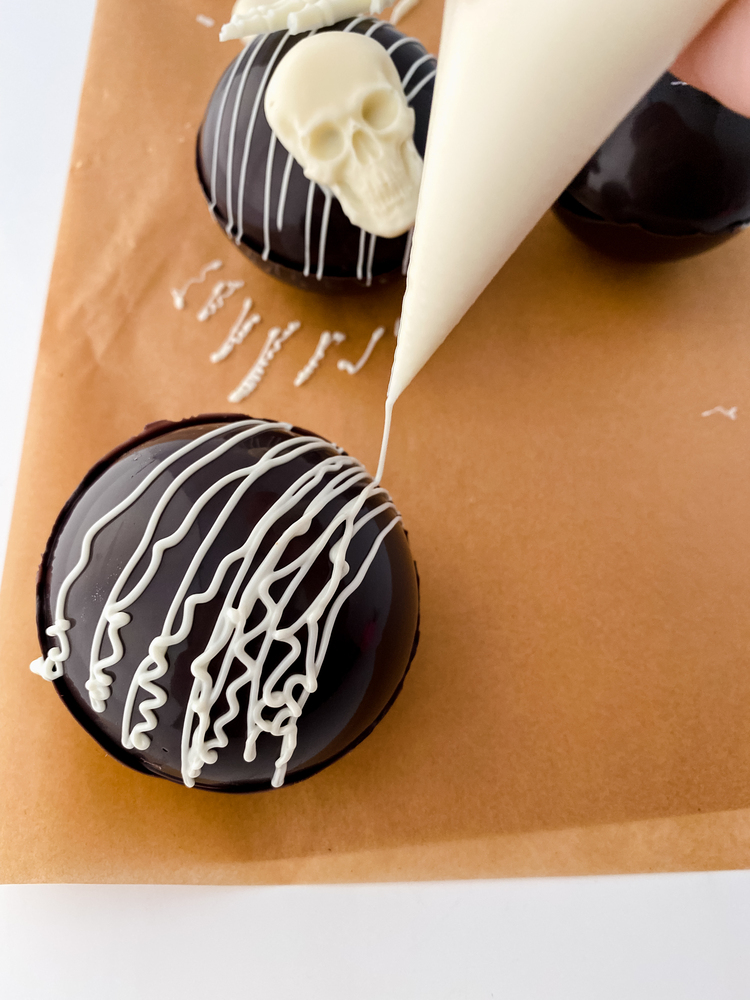
For an artistic touch, melt colored candy melts and create patterns on the cocoa bombs. You could also add some Halloween sprinkles!
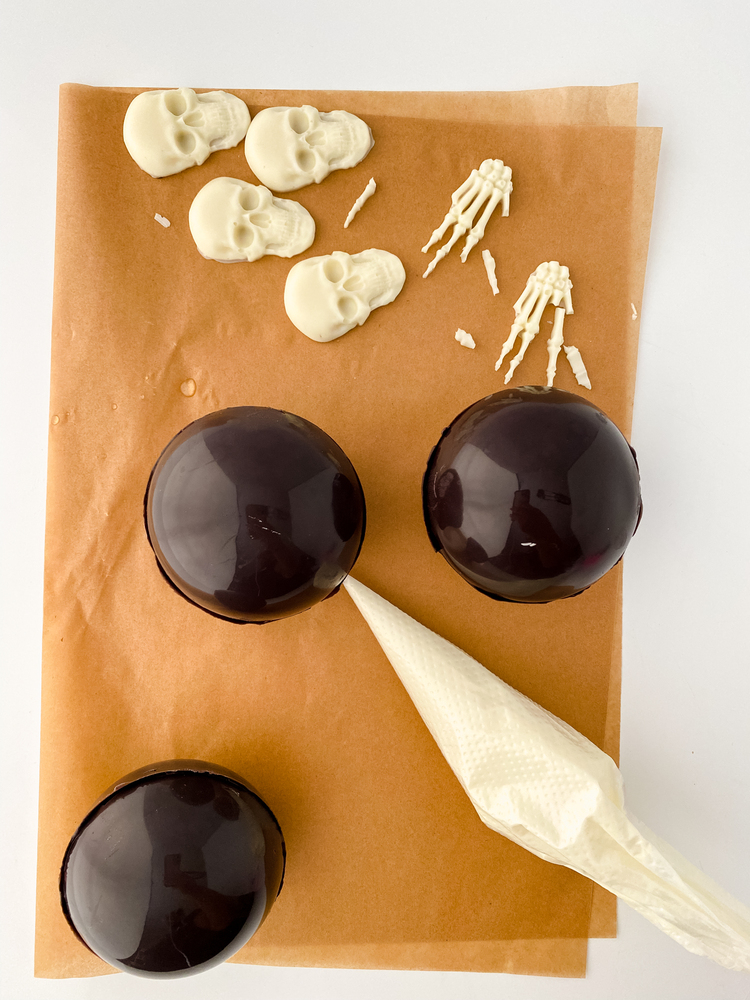
Remove the skeleton molds and peel out the chocolate. Use leftover melted chocolate to stick them to the chocolate spheres.
Three Methods for Cocoa Bomb Closure
When it comes to creating the perfect cocoa bomb, the sealing process is where the magic truly happens. There is no perfect way, but there are a couple of methods you can use: the hot plate method, pipe melted chocolate method, or the frying pan method.
Hot Plate Method
Begin by boiling a large pot of water. Then, place a small plate into the hot water, letting it absorb the warmth without the risk of burning yourself.
As you prepare to seal your cocoa bombs, remove the plate from the water, and dry it off completely. Then, melt the rim of one chocolate sphere gently over the warm plate. This will create a slightly melted edge that you can carefully attach to the rim of the other sphere.
Press them together gently, allowing the melted chocolate to create a secure bond. The hot plate method ensures a neat seal and a professional finish, transforming your cocoa bombs into a work of art.
Pipe Melted Chocolate Method
To begin, take some of your leftover melted chocolate and transfer it into a piping bag or a small Ziploc bag. Cut a small hole at the end of the piping bag or snip off one corner of the Ziploc bag.
Squeeze the melted chocolate along the rim of one chocolate sphere, making sure to create a continuous line. Then, gently place the other half on top of the piped chocolate, pressing it down slightly. As the chocolate hardens, it forms a secure bond, sealing the cocoa bomb.
You can even use your finger to smooth out the chocolate and create a clean finish. To add an extra layer of enchantment, consider adding sprinkles or crushed candies to the piped chocolate before it sets.
Frying Pan Method
Begin by heating a frying pan over a low flame until it’s warm to the touch, then remove it from the heat source. This gentle warmth will be your secret ingredient for melting the chocolate edges.
Take one chocolate sphere and gently press its rim onto the warm skillet for a few seconds. The residual heat will begin to melt the chocolate, creating a smooth, velvety edge.
Now, place the other half of the cocoa bomb onto the slightly melted rim and press them together. The heat from the pan’s surface will aid in fusing the chocolate halves seamlessly. It’s a method that requires a deft touch, but with practice, you’ll achieve a professional finish that showcases your cocoa bomb craftsmanship.
How to Enjoy Hot Chocolate Bombs
Enjoying festive hot chocolate bombs is a delightful and interactive experience that adds a touch of magic to your cozy moments. Here’s how to savor these enchanting treats:
- Prepare Your Mug: Start by choosing your favorite mug and warming it up slightly. This helps maintain the warmth of your hot cocoa once it’s poured in.
- Pour Warm Milk: Heat up your preferred type of milk, whether it’s dairy, almond, oat, or any other variety. Ensure it’s warm but not boiling. Carefully pour the warm milk over the cocoa bomb in your mug.
- Watch the Magic Unfold: As the warm milk touches the cocoa bomb, the outer chocolate shell will start to melt and dissolve, revealing the hidden treasures within. Watch in awe as the chocolate crumbles away to unveil a swirling cloud of cocoa mix and a flurry of mini marshmallows.
- Stir and Sip: Once the cocoa bomb has completely dissolved, give your mug a gentle stir to blend the cocoa mix and melted chocolate into the milk. The result is a rich, velvety cup of hot cocoa with a touch of indulgent decadence.
- Savor Every Sip: Take a moment to enjoy the comforting aroma and luxurious taste of your hot cocoa. The combination of creamy milk, rich chocolate, and fluffy marshmallows creates a harmonious symphony of flavors that soothes the senses and warms the soul.
Additional Considerations When Making Cocoa Bombs
Making cocoa bombs can be a fun experience, but a little foresight can go a long way in ensuring your creations turn out perfectly. Here are a few additional considerations to keep in mind:
1. Room Temperature and Humidity: The temperature and humidity of your kitchen can affect the melting and setting of chocolate. Extremely warm or humid conditions might cause the chocolate to become too soft or not set properly. If you’re working in such an environment, consider using an air-conditioned room or working during cooler times of the day.
2. Chocolate Quality: The quality of the chocolate you use can greatly influence the final result. Opt for good-quality candy melts or chocolate that is meant for melting and molding. Lower-quality chocolate might not melt smoothly, affecting the texture and appearance of your cocoa bombs.
3. Avoid Water: Chocolate and water don’t mix well. Even a tiny amount of water can cause chocolate to seize, becoming lumpy and unworkable. Make sure all your equipment, including bowls, utensils, and molds, are completely dry before you start working with chocolate.
4. Melting Intervals: When melting chocolate, use short 30-second intervals in the microwave and stir well each time. Overheating chocolate can cause it to scorch and become unusable. Stirring helps distribute the heat evenly and prevent hot spots.
5. Patience is Key: Allow each layer of chocolate to set properly before moving on to the next step. Rushing through the process might lead to cracked or misshapen cocoa bombs.
6. Storage: Once your cocoa bombs are complete, store them in a cool, dry place away from direct sunlight. Heat can cause the chocolate to soften and lose its shape, while humidity can lead to condensation on the surface.
7. Experiment and Have Fun: Don’t be afraid to experiment with different fillings, decorations, and designs. Let your creativity flow and have fun throughout the process. Whether you’re a beginner or an experienced chocolatier, each cocoa bomb you create is a unique masterpiece.
Remember that practice makes perfect, so don’t be discouraged if your first attempts don’t turn out exactly as you envisioned. The more you work with chocolate and hot chocolate bomb molds, the more you’ll hone your skills and produce cocoa bombs that are not only delicious but also visually stunning.
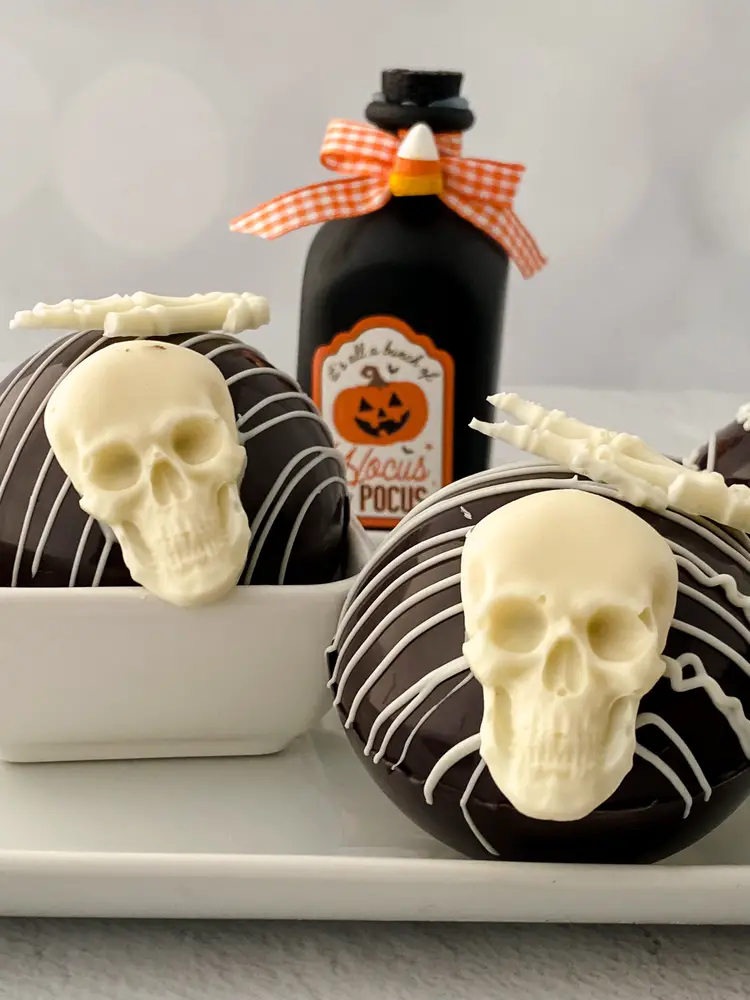
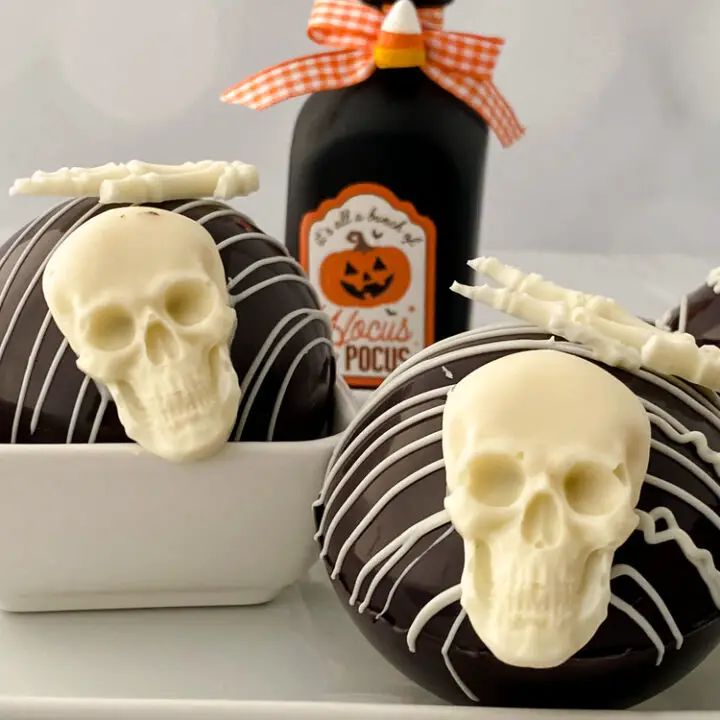
Halloween Hot Chocolate Bombs
Indulge in the Halloween spirit with these Skeleton Hot Cocoa Bombs! Filled with hot cocoa mix and mini marshmallows, they'll reveal a ghoulishly delicious surprise when dropped into warm milk, making your Halloween festivities truly enchanting.
Ingredients
- 8oz Black Candy Melts
- 1/2 cup white candy melts
- 4 tbsp Hot Cocoa
- Mini Marshmallows
- Coconut oil or paramount crystals
Instructions
- In the microwave, melt the black candy melts plus 1 tsp solid coconut oil or paramount crystals for 30 seconds.
- Stir, then return to the microwave for an additional 30 seconds.
- If there are still any lumps, return for 10-15 seconds. Stir until smooth.
- Add a heaping spoonful of melted chocolate to the mold.
- Use the back of a spoon to coat the mold with chocolate.
- Freeze for 15 mins.
- Melt the white chocolate using the same method as before.
- Spoon into the skeleton mold.
- Freeze for 10-15 mins.
- Carefully peel spheres out of the molds.
- Add a tablespoon of cocoa mix and mini marshmallows to the inside. Choose a method to seal the bombs together:
Use a frying pan. Heat the frying pan and remove it from heat. Carefully melt the rim of the sphere and immediately attach it to one of the bottom halves.
Hot Plate Method: Boil a large pot of hot water and add a small plate to it. The plate will hold the heat without the risk of burning yourself. Be sure to dry the plate fully before using it, as water seizes chocolate.
Pipe melted chocolate: Use leftover melted chocolate. Add to a piping bag or small Ziploc bag. Cut a small hole at the end of the piping bag (or one corner of the Ziploc bag). Squeeze chocolate around the rim of the bottom sphere and simply place the other sphere on top. Using your finger, smooth the chocolate out. (leave as is or add sprinkles or crushed candies)
Once connected, melt colored candy melts, add to piping bag and create a pattern, top with coarse sugar.
Notes
- If cocoa bombs are being made in advance they can be frozen and stored.
- Remove skeleton molds, peel out chocolate.
- Use left over melted chocolate to adhere to the bombs.
Recommended Products
As an Amazon Associate and member of other affiliate programs, I earn from qualifying purchases.
-
 4 Pieces 3D Skeleton Hands Skull Halloween Silicone Fondant Molds Halloween Party Chocolate Candy Clay Moulds for DIY Chocolate, Cake, Pudding, Ice Cream, Epoxy Resin Mould, Pink
 -
![Silicone Molds [Half Sphere, 6 Cup] Cupcake Baking Pan - Free Paper Muffin Cups - Non Stick, BPA Free, 100% Silicon & Dishwasher Safe Silicon Bakeware Tin - Kitchen Rubber Tray & Soap Molds](https://m.media-amazon.com/images/I/4157PRN7-TL._SL500_.jpg) Silicone Molds [Half Sphere, 6 Cup] Cupcake Baking Pan - Free Paper Muffin Cups - Non Stick, BPA Free, 100% Silicon & Dishwasher Safe Silicon Bakeware Tin - Kitchen Rubber Tray & Soap Molds
Silicone Molds [Half Sphere, 6 Cup] Cupcake Baking Pan - Free Paper Muffin Cups - Non Stick, BPA Free, 100% Silicon & Dishwasher Safe Silicon Bakeware Tin - Kitchen Rubber Tray & Soap Molds
Nutrition Information:
Yield: 4 Serving Size: 1Amount Per Serving: Calories: 381Total Fat: 4gSaturated Fat: 3gTrans Fat: 0gUnsaturated Fat: 0gCholesterol: 0mgSodium: 46mgCarbohydrates: 87gFiber: 0gSugar: 56gProtein: 0g
How to Store Hot Cocoa Bombs
To ensure your cocoa bombs remain in their best condition, proper storage is key. Here’s how to store cocoa bombs to maintain their freshness and visual appeal:
1. Cool and Dry Location: Store your cocoa bombs in a cool, dry place away from direct sunlight and heat sources. Excess heat can cause the chocolate to melt or soften, altering the shape and texture of the bombs.
2. Airtight Container: Place the cocoa bombs in an airtight container or resealable plastic bag. This helps prevent moisture from affecting the chocolate and maintains the quality of the filling.
3. Layers: If you’re storing multiple cocoa bombs, consider placing a layer of parchment paper between them to prevent them from sticking together.
4. Avoid the Fridge: While it might be tempting to store cocoa bombs in the refrigerator, the cold and humidity can cause condensation on the chocolate, affecting its texture. Stick to a cool pantry or cupboard instead.
5. Limited Timeframe: Cocoa bombs are best enjoyed within a few weeks to a couple of months of being made, as the freshness of the ingredients and the quality of the chocolate can gradually degrade over time.
6. Decoration Consideration: If your cocoa bombs are elaborately decorated with delicate patterns or elements, take care when handling and storing them to avoid damaging the decorations.
7. Freezing (Optional): If you plan to store cocoa bombs for an extended period, you can consider freezing them. Wrap each bomb individually in plastic wrap and then place them in an airtight container or resealable bag. Thaw them in the fridge or at room temperature before using, but keep in mind that condensation might occur upon thawing.
By following these storage tips, you can keep your cocoa bombs looking enticing and ensure that they’re ready to deliver their magical experience whenever you’re ready to enjoy them.
Hot Cocoa Bomb Variations
In addition to these Halloween chocolate bombs, here’s a list of other delightful hot cocoa bomb variations that you can experiment with to create a diverse range of flavors and themes:
- Peppermint Bliss: Fill your cocoa bombs with crushed peppermint candy and a sprinkle of peppermint extract for a refreshing twist on traditional hot cocoa.
- Caramel Dream: Add caramel bits or drizzle caramel sauce inside the cocoa bombs for a rich, buttery flavor that pairs perfectly with chocolate.
- Pumpkin Spice: Embrace the fall season by incorporating pumpkin spice mix into your cocoa bombs for a warm and comforting autumnal treat.
- Salted Caramel Mocha: Combine cocoa mix with instant coffee and a pinch of sea salt for a decadent mocha flavor with a hint of salted caramel goodness.
- White Chocolate Raspberry: Fill your cocoa bombs with white chocolate chips and freeze-dried raspberry pieces for a sweet and tangy flavor combination.
- Cookies and Cream: Crushed chocolate sandwich cookies or chocolate cookie crumbs make for a delightful surprise inside your cocoa bombs, creating a cookies-and-cream experience.
- Nutella Delight: Add a spoonful of Nutella to the cocoa mix for a hazelnut-infused cocoa bomb that’s rich and indulgent.
- Coconut Paradise: Incorporate shredded coconut and a drop of coconut extract for a tropical twist on classic hot cocoa.
- Orange Chocolate Zest: Infuse orange zest into your cocoa mix for a citrusy punch that pairs wonderfully with the richness of chocolate.
- Matcha Magic: For a unique and vibrant twist, use matcha powder in your cocoa bombs, creating a soothing and earthy flavor.
- Chai Latte Fusion: Combine chai spices like cinnamon, cardamom, and ginger with your cocoa mix for a cozy and aromatic treat.
- Irish Cream Elegance: Incorporate a splash of Irish cream liqueur into your cocoa mix for a grown-up version of hot cocoa.
- S’mores Sensation: Fill your cocoa bombs with mini marshmallows, crushed graham crackers, and chocolate chips to recreate the classic campfire treat.
- Cinnamon Toast Crunch: Add a touch of ground cinnamon and a sprinkle of brown sugar to your cocoa mix for a nostalgic and comforting flavor.
- Dark Chocolate Raspberry: Infuse the cocoa mix with freeze-dried raspberry powder and dark chocolate chips for an intense burst of berry and chocolate flavors.
These are just a few creative ideas to get you started on your hot cocoa bomb journey. Feel free to mix and match flavors, ingredients, and decorations to create your own signature variations that cater to your taste buds and special occasions.
More Halloween Chocolate Gift Ideas
Gifting these homemade cocoa bombs brings an extra layer of joy to the experience. Presenting friends and loved ones with these delicious surprises showcases the thought and effort you’ve put into creating a perfect treat that’s as heartwarming as it is visually stunning.
Whether you’re assembling them for a Halloween party, a cozy night in, or as a unique gift, Skeleton Cocoa Bombs encapsulate the charm of the season and the joy of sharing something truly special.
If you’re looking for some more Halloween chocolate treat ideas, you’ll want to check out Harry & David.
Whether you’re seeking to surprise loved ones with whimsical gift boxes or aiming to adorn your own festivities with decadent delights, Harry & David’s exquisite range of treats, carefully curated and elegantly presented, is a testament to their commitment to making Halloween an occasion to remember.
Enjoy this Hot Cocoa Bomb Recipe
With your Skeleton Cocoa Bombs complete, you’re ready to enjoy the enchantment they bring to your Halloween celebrations.
So, get your creativity flowing, put on your apron, and let the magic unfold, one cocoa bomb at a time!
 Skip to Recipe